2Bit's Mapping Corner on www.PythonOnline.co.uk
ET Mapping Tutorial

Lesson 29

Topics

Forward Spawn Flags
 
Forward Spawn Flags
Scripting
Back to main menu
Forward Spawn Flags [Top]
These are quite easy to do, but you need to be careful with the script to make sure they will perform the right way for the situation you want.

There are a few varieties of behaviour, such as:

  •  the flag is owned by no-one at the start
  •  the flag is owned by a team at the start but they can't spawn there
  •  the flag is owned by a team at the start and they can spawn there but it's not the default
  • when the flag is captured, it becomes the default spawn for the capturing team
  • when the flag is captured, it doesn't become the default spawn for the capturing team

All variations on a theme.  The one I'll demonstrate is the flag owned by no-one, which will become the default spawn for the capturing team.  The losing team will then spawn back at their original spawn point.

Run Radiant  and open the map.  Don't forget to make backups from time to time.

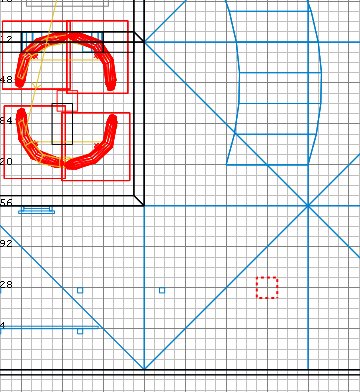
We'll start by putting the flag down.  In the 2D view, right click at the point shown and select team/team_wolf_checkpoint.

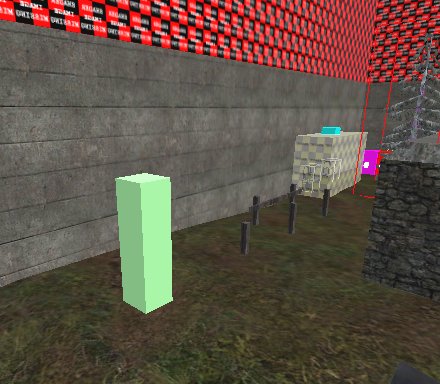
In the side 2D view, move the entity until its bottom just about goes into the ground.  Be aware that if you put a flag on a rooftop, the rolled up flag of the losing team will appear below the bottom of the flagpole, which might appear to be hanging from the ceiling of the room below...

Press N.  Close the window and press N again.

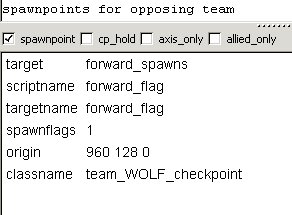
Tick the spawnpoint box.

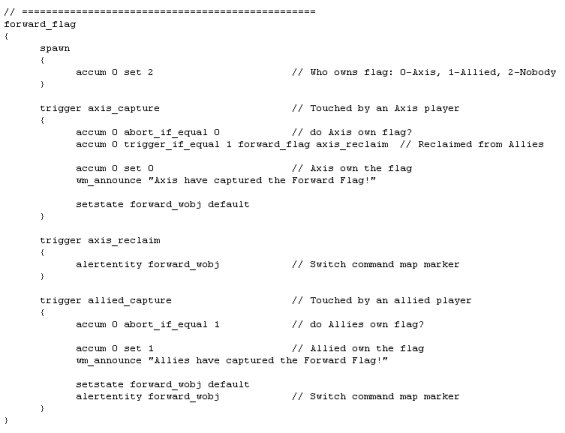
We need to provide a name for the entity so we can have a script procedure for it.  Enter a targetname of forward_flag and then a scriptname also of forward_flag.

The name can be anything of course, but we'll use forward_flag for now.  This value is not shown to players.

Finally we need to tell the flag the names of the spawn locations that it is controlling: enter a target of forward_spawns.

Ok, now we'll add the spawn points for both teams.  We'll add just one of each to illustrate the technique - but you would need to add 32 for each side.

Right-click in the 2D overhead view where you want the first allied soldier to arrive, and select team/team_ctf_bluespawn.  In the side view make sure the entity is on or just above the ground.  For irregular surfaces like terrain, make it just above, otherwise he'll start with his feet in the ground and not be able to move.

Press N, and tick the invulnerable box.  I think this may be redundant but what the heck.  We won't tick the startactive box because we don't want him spawning here yet.

Click on one of the 8 directional buttons at bottom left of the Entities window, to set the direction the player will be looking in on spawning.

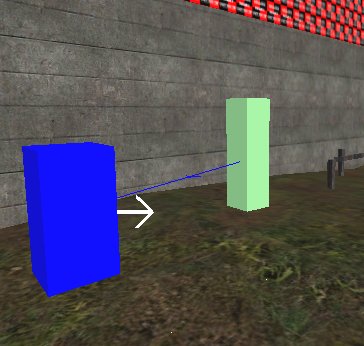
Enter a targetname of forward_spawns and close the entities window.  If you have done everything right, the flag will now have a line drawn to the blue spawn entity.  Press ESC.

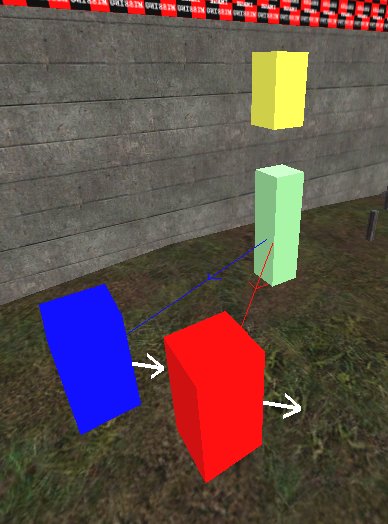
Now right-click in the 2D overhead view where you want the Axis soldier to spawn.  If space is tight, the axis spawns can overlap the allied spawns.  Select team/team_ctf_redpawn and position it clear of the ground and press N.

Now do the same things that you did for the blue spawn, that is, set the invulnerable box and give it the same targetname, and any facing direction you want.  Close the window and press ESC.

You should have a red line connecting the flag to the spawn.

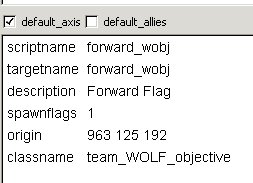
Finally we need to add the command map marker entity to show where the flag is.  Usually you put this over the flag entity.  So right-click on the flag entity in the overhead view and select team/team_wolf_objective.  Position the entity a little over the flag.

Press N.   There has to be a default owner, even if really there is none.  So tick the default_axis box.  We'll take care of the real situation in the script.

Enter a description of Forward Flag - this text will be shown on the command map.  Enter a targetname and scriptname of forward_wobj.

Close the window and press ESC.  We have completed the mapping element.

Save the map and compile it.  Don't run ET yet.

Scripting [Top]
Open tutorial.script, and enter the following script just before the gate procedure, as this procedure will start with "F".
forward_flag  
{  
}  
Then inside the curly brackets, put in the following text.  I suggest you cut and paste it from here, but you ought to add the indentation manually so you can see where everything belongs:
spawn

{

accum 0 set 2 // Who owns flag: 0-Axis, 1-Allied, 2-Nobody

}

trigger axis_capture // Touched by an Axis player

{

accum 0 abort_if_equal 0 // do Axis own flag?

accum 0 trigger_if_equal 1 forward_flag axis_reclaim // Reclaimed from Allies

accum 0 set 0 // Axis own the flag

wm_announce "Axis have captured the Forward Flag!"

setstate forward_wobj default

}

trigger axis_reclaim

{

alertentity forward_wobj // Switch command map marker

}

trigger allied_capture // Touched by an allied player

{

accum 0 abort_if_equal 1 // do Allies own flag?

accum 0 set 1 // Allied own the flag

wm_announce "Allies have captured the Forward Flag!"

setstate forward_wobj default

alertentity forward_wobj // Switch command map marker

}

It should look like this in layout:

Finally you'll need to add this line into your game_manager procedure (so that the flag doesn't initially show on the command map)

setstate forward_wobj invisible

...and change the autospawn locations to "Forward Flag" so that both teams will automatically spawn at the forward flag, if it is available to them.  If not, the players will spawn back at the original spawn.

So your game_manager ought to look like:

You can now have a go in ET and delight in your forward spawning opportunities :)

You may find the flying flag is a bit dark.  You can either add a little light entity over or near it, or experiment with changing the direction the flag flies in - just set the angle of the team_wolf_checkpoint (flag entity).

If you are not interested in what the script is doing, skip to the next lesson now.  Otherwise keep reading, as this starts to get us into the scripting fundamentals.

Explanation of the script

On game start, the flag's spawn trigger is executed.  It sets accum 0 to 2.  An "accum" (short for accumulator, a term used in assembly programming) is a variable, in which you can store integers.

Each procedure can use up to 10 accums, numbered 0 to 9.  The values stored in these procedural accums are not accessible to other procedures.  If you need to have values accessible across procedures, you use a globalaccum which are also numbered 0 to 9.  A map can only have a maximum of 10 globalaccums.
Accum 0 is used by this procedure to indicate the condition that the flag is in, ie who owns it.  It uses the value 2 to indicate "no owner".

The allied_capture and axis_capture triggers are predefined names, and the relevant trigger is executed when a player touches the flag (even if his team already own the flag).

We'll look at allied_capture first:

When an allied soldier touches the flag, the trigger is executed.  The first thing it does is check the value of accum 0.

If the value in accum 0 is 1 it indicates that the allies already own the flag, so the code is aborted and nothing else happens.

Otherwise the allies have captured the flag, so accum 0 is set to 1 to record this.

Then the wm_announce is executed to tell the players about this event.

Now that the flag has been captured, the allies can spawn at it, so it must appear on the command map: setstate forward_wobj default means makes the command map icon visible.

Finally, alertentity forward_wobj toggles the owner of the spawnpoint, from Axis to Allied.

Now look at axis_capture.

When an axis soldier touches the flag, the trigger is executed.  The first thing it does is check the value of accum 0.

If the value in accum 0 is 0 it indicates that the axis already own the flag, so the code is aborted and nothing else happens.

Then it checks to see if the flag was previously owned by Allies - this will always be the case after the allies have captured the flag for the first time.  But if the allies are yet to capture the flag, the default_axis setting means the axis are deemed to already be the owners, so we wouldn't want to toggle the owner away.

So if the allies were the owners, the trigger axis_reclaim trigger is executed (this is a routine I created, not an ET pre-supplied one).  Its function is just to toggle the owner back to axis.

Then just like the allied routine, the new owner is recorded, an announcement made, and the command map icon made visible.

That's it.

Next lesson