|
Wow, just 37 lessons later and the survivors
among you are ready to make your first PK3
file, so you can publish your map to the
gaming community.
This is probably a good time to mention
that not everyone will love or appreciate
the couple of hundred hours of effort you
put in. Despite being generally well
received, I've had "This map is
crap" from somebody or other for all of
the maps I've made. You can't please
everyone all of the time, so develop a thick
skin now...
Your PK3 must contain all of the material
that doesn't come as standard with the
regular ET installation.
If you miss any components, either your
map won't load/run properly, or the players
will see the ugly yellow/black "missing
texture" squares.
Run Pakscape (link is in lesson
10), click File/New
Create these folders (substitute tutorial
for your map name):
- levelshots
- maps
- maps/tutorial
- scripts
- sound
- sound/maps
- sound/scripts
- textures
- textures/tutorial
Now we need to import all the required
files into the appropriate pakscape
folders. Be sure that you have removed
any testing aids you added in the script, at
least by commenting them out (eg, you may
have shortened the respawn time, lengthed
the map time or included
"wm_announces" to tell you when
things are happening).
Click on levelshots and then
right-click in the right-hand pane, and
select object/import file.
Navigate to etmain/levelshots and
select tutorial.tga and tutorial_cc.tga
and click Open to import them.
Click on maps and import from etmain/maps
these files: tutorial.bsp,
tutorial.objdata, tutorial.script and tutorial_tracemap.tga.
Then right-click again in the same pane
and select object/import directory
and select the etmain/maps/tutorial
folder to import it and its contents (a load
of files named lm_0000.tga, lm_0001.tga,
etc). The number of files will depend
on the size/shape of your map.
Click on scripts and import from etmain/scripts
these files: tutorial.arena,
tutorial.shader and tutorial_levelshots.shader.
Click on sound/maps and import etmain/sound/maps/tutorial.sps.
Click on sound/scripts and import etmain/sound/scripts/tutorial.sounds.
Click on textures/tutorial and
import any bespoke textures files from the etmain/textures/tutorial
folder.
If you are using a skybox, import the skybox
folder and its contents also into the textures/tutorial
pakscape folder.
Create a readme.txt file in Wordpad or
similar, copying the style of an existing
one from another pk3. Then import it
into pakscape at the root level.
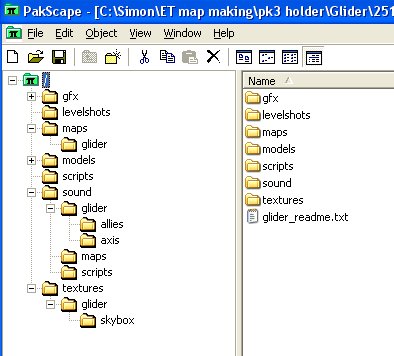
Here's an image of the glider.pk3
contents as an example of how yours might
look. There are additional folders
than those we've covered, as there are
components included that have not been
covered in the tutorial thus far. I
had allied and axis specific bespoke sounds
in glider, hence the presence of allied
and axis folders within the glider
folder.
Save the file - I use a file naming
convention that includes the map
version. This helps people identify
when new versions have come out, and also
allows players to play different versions on
different servers without perpetually having
to download one version over the top of
another.
So I would suggest calling version 1
either tutorial1.pk3 or tutorial_100.pk3 (I
use v1.0.0 syntax for version naming).
You should now test the PK3 in your
etmain folder. If you see horrible
random shadows all over the place, it
generally means you haven't properly
included the etmain/maps/tutorial tga
files contents.
Be sure to remove the pk3 from etmain
before any Radiant reworking - if you
forget, when you attempt to test your
changes ET will instead still load the old
pk3 version.
If you can, test your PK3 on a different
computer, preferably one with a vanilla
installation of ET, to highlight any
omissions you may have made.
Your map is now publishable. The
lessons to follow are optional, and rather
more complicated, and only needed if you
want to get on to more sophisticated
elements such as tanks and fancy terrain
merging shaders etc.
|