2Bit's Mapping Corner on www.PythonOnline.co.uk
ET Mapping Tutorial

Lesson 28

Topics

Making a destructible object like a gate
 
Preparation
Making the destructible
Writing the script
Back to main menu
Preparation [Top]
Like constructibles, destructibles are best made by using a template already created.

I have put an allied destructible template here for you to download.  Unzip it and put the 2 files into your maps/prefabs folder.  Don't amend these, just use them as the template to stamp out allied destructibles as you need them.

Make a copy of etmain/maps/prefabs/prefab_allied_destructible_template.map and call it etmain/maps/_temp.map.  By calling the copy "_temp" it will appear early in your list when you import it, and you know to chuck it away later on because it is "temp".

Edit _temp.map with Wordpad or similar.  Make these changes:

  • Replace all instances of "allied_destructible" with "gate" as this is the name we'll use for the gate destructible.  You could of course use any name that suits you.
  • Replace all instances of  "Allied Destructible" with the name to appear on the Command Map and next to "you are near...".  In this instance we're making a big gate, so make it "Main Gate".
  • Save and close the file.
Making the destructible [Top]
Run Radiant and open the map.  We're going to put the destructible gate into some clear space.

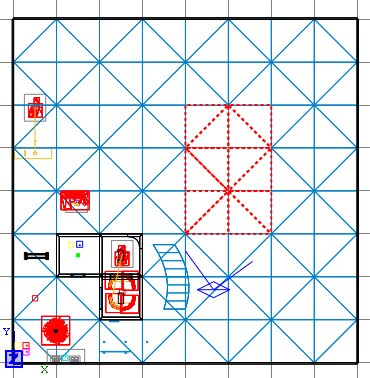
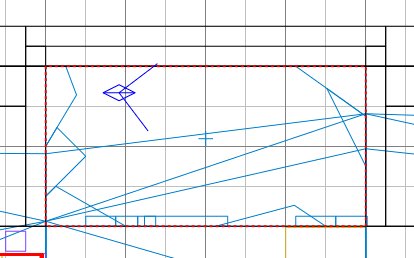
Select grid size 9.  Get the 2D view over the clear space and delete the few bits of terrain as shown.

Now draw a brush in the space we've made, make it wall03_mid texture, and make it Detail.  Then select it again, lift it up so you can see the bottom and caulk the bottom face (Tip: select the face to be caulked, then also select a nearby caulked face - this will bring the caulk texture into view in the textures window, ready for your quick selection.)

Then move the brush back down into the gap, and ensure it neatly fits with no gaps showing around the sides where the terrain brushes meet it.

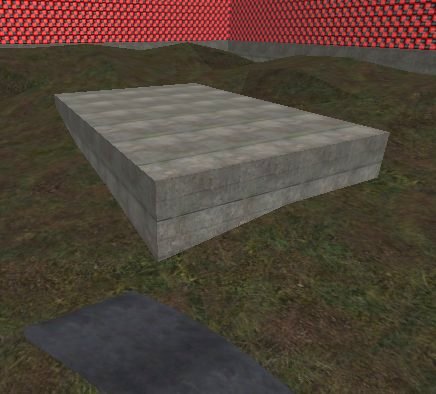
We will put the gate to be destroyed on this nice flat surface.  Import _temp.map and move the imported selection onto the middle of the flat slab.

Now to explain what we have here.

Shift+alt+click the trigger brush, and press N.  Close the window and press N again so we see the tick boxes.

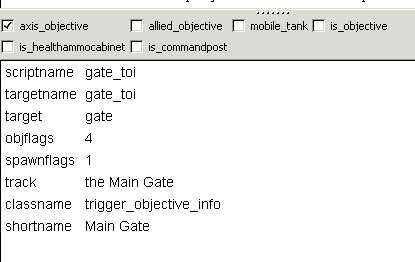
This is an axis_objective because it is owned by the axis team.  It seems to me that something to be destroyed by the allies ought to signify an allied objective, which is exactly why you should use a prefab as it is easy to tick the wrong boxes when creating one from scratch.

The targetname and scriptname are gate_toi, being the name of the destructible plus "_toi" to indicate the trigger_objective_info.  This is not a universal naming standard, it's just one I adopted for myself so I could easily identify an entity type by the type of name it had.

The target is the name of the destructible entity - you can tell if you've made a naming error because the trigger brush won't have an arrow line connecting it to the target brush(es).  This line can't really be seen when the target brush is inside the trigger, which it normally would be because the trigger indicates where the attacker must plant dyna or chuck the satchel.  So to see it, select grid scale 9 and drag the trigger brush away a notch.

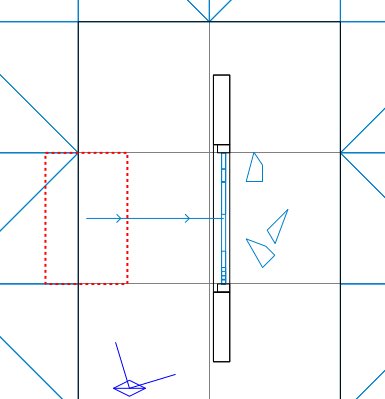
Now you can see the arrow connecting line, so the names are ok.  Put the brush back over the gate.

The objflags is set to 4, telling ET to show a dyna symbol when a player enters the brush.  I haven't seen a full list of possible values and I don't remember where I read even the partial list that told me to use 4 for dyna, but there will be a different value for different symbols.  The only other one you might want really is the satchel symbol.  Experiment with powers of 2 (1, 2, 4, 8 etc) to discover what the symbols are if you need symbols other than dyna.

The spawnflags is set to 1, which is a reflection of the tick box settings we have.  The other values are obvious.

Hide the trigger so we can examine the other components.

Shift+alt+click the middle of the gate until the whole rectangle is selected (I'm using grid scale 6 again now).

This is the thing we want to blow up.  Press N.

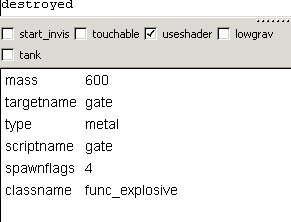
We have the useshader ticked so the temporary fragments are textured nicely.

The mass tells ET how chunky to make the bits that fly away from the bang.  These bits will all disappear after a short time.

The targetname and scriptname are "gate", which will be referenced in the script.

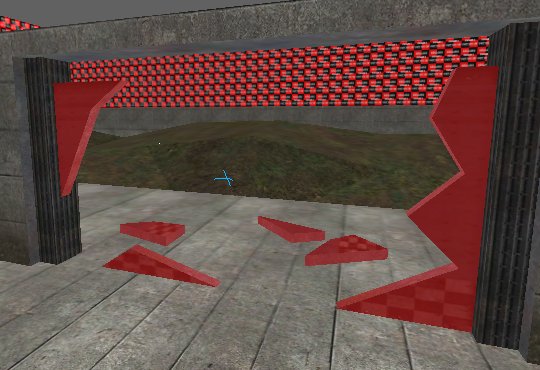
Hide the gate.  Now you can see the remnants that will be permanently shown after the explosion.  They won't be visible before the explosion because they will be invisible when the map starts.  You don't have to have remnants, it's up to you.  I include them here so you can see how they are made if you want them.

Shift+alt+click on a remnant brush and they will all get selected.

These bits were made by copying the gate brush (and then right-click and "Move into Worldspawn" so that the copy wasn't a desctructible).  The copy was then chopped up with the clipper tool.  Most of the copy was deleted, some of the bits were left in place, and some scattered onto nearby ground (with the downward face caulked of course).

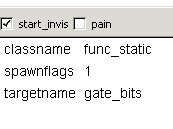
Then all the bits were selected and made into a func_static which is a way of making some brushes into an entity so you can refer to that entity.  We will need an entity name because we will want to make these bits visible after the explosion.

The start_invis box is ticked.  Makes sense.  I gave the entity a targetname of gate_bits so I knew what I would be referring to in the script.

Reveal the hidden brushes, close the Info window if you have it open, save the map and compile it.  Don't run ET yet.

Writing the script [Top]
Using Wordpad or similar, open the prefab_allied_destructible_template.script file.  Copy all the text, and paste it into the tutorial.script file, at the bottom of the file.  This is because we will name this section "gate", and so that will be the right place alphabetically.

Replace all 5 instances of allied_destructible with gate.

Later on we'll add some speech but we'll skip that for now.

As the gate should be destroyable by dyna, change the constructible_class to 3.

As the script is simple I will explain what's happening as if we were writing it from scratch.


You start by declaring a procedure by entering its name.  A procedure must be wholly enclosed by "{" and "}".

So you would begin writing the procedure by typing:

gate  
{  
}  

Within the procedure you can have as many blocks of script as you need.  These blocks are called triggers.  There are several triggers with predefined names, such as spawn and death.

The spawn trigger is optional in any procedure.  If included, it gets executed once-only, at the start of the map.  You should always put a small delay in at the start of a spawn trigger, to allow all the spawning entities to arrive in the map before you might start trying to reference them.

First we'd add the spawn trigger.  It is created inside the brackets of its parent procedure.  I always add the "{" and "}" immediately I create a new trigger, so I don't accidentally leave out a closing "}".  If you do, it can create some interesting errors when the map loads and you'll wonder what the hell is wrong.

gate  
{  
  spawn
  {
  }
}  

We need a spawn trigger because we have to tell ET what weapons can destroy this destructible.  So we add this info to the spawn trigger, following a wait of 300 milliseconds.  A number between 50 and 500 is usual, with the choice being fairly random really.  Two slashes "//" mean the rest of the line is just comments and not script.

gate    
{    
  spawn  
  {  
    wait 300
    constructible_class 3 // 2=satchel 3=dyna
  }  
}    

We also need a death trigger, to tell ET what to do when the gate is destroyed.  The death trigger is also placed within the "{" and "}" of its parent gate procedure, not within the brackets of the spawn trigger.

gate    
{    
  spawn  
  {  
    wait 300
    constructible_class 3 // 2=satchel 3=dyna
  }  
  death  
  {  
  }  
}    

This is what we want to happen when the gate is destroyed:

  • Hide the original undamaged gate - this is automatically done and we don't have to script anything
  • Show the damaged gate bits - alertentity gate_bits : alertentity toggles the visibility of the gate_bits entity, ie reveals it in this instance
  • Remove the "You are near..." prompt - trigger gate_toi remove : which means execute the remove trigger in the gate_toi procedure
  • Tell the players that the gate has been blown up - wm_announce "The Allies have destroyed the gate!"
gate    
{    
  spawn  
  {  
    wait 300
    constructible_class 3 // 2=satchel 3=dyna
  }  
  death  
  {  
    alertentity gate_bits
    trigger gate_toi remove
     
    wm_announce "The Allies have destroyed the gate!"
  }  
}    

Finally we have to create a procedure for the trigger_objective_info entity, so that it can be removed when the gate is destroyed.

gate    
{    
  spawn  
  {  
    wait 300
    constructible_class 3 // 2=satchel 3=dyna
  }  
  death  
  {  
    alertentity gate_bits
    trigger gate_toi remove
     
    wm_announce "The Allies have destroyed the gate!"
  }  
}    
     
gate_toi    
{    
  trigger remove  
  {  
    remove
  }  
}    

The trigger called "remove" is not a standard ET provision, so we have to show that it is a user-defined trigger, ie made up by us, by prefixing it with the word "trigger".

The "remove" instruction within the trigger tells ET to delete this brush from the game as we no longer need it at all - which is why we don't just hide it.

Save and close the script file.

Run ET and have fun destroying the gate  :)

I'll get some Axis templates together for you shortly.

You may now have visions of making a map with dozens of constructibles and destructibles.  Unfortunately there is a limit of 18 trigger_objective_info entities in a map.  And it's easier than you might think to eat away at that total amount, as TOI entities get used for other main game elements too.  Consider Fueldump, and count the TOIs:
  1. Tank
  2. Ammo cabinet in the Allied shack
  3. Allied MG42 outside the shack
  4. Bridge
  5. Footbridge
  6. Axis CP
  7. Axis MG42 tower overlooking bridge
  8. Allied CP
  9. Ammo cabinet near allied CP
  10. Axis MG42 tower  near allied CP
  11. Allied MG42 near allied CP
  12. West fence
  13. East fence
  14. Fuel dump
Next lesson